Cayenne and the Raspberry Pi
Why Cayenne?
If writing software isn’t really your thing but you still want to create an interesting Internet of Things (IOT) project then you should definitely look into using Cayenne and the Raspberry Pi as a solution. myDevices is the company behind the Cayenne software, it has been designed as a Drag and Drop IOT platform that allows people to very quickly develop projects using a wide range of sensors, motors, relays and extension boards.
Cayenne allows you to control your GPIO ports as inputs or outputs, the connected items are presented in a dashboard that can include graphs, gauges, sliders or simple on/off indicators. You can access your dashboard from any browser or there is also a mobile app available that lets you easily connect, generate triggers, alerts or scheduled actions and monitor from anywhere in the world.
In this article I will show you how to connect a simple DS18B20 temperature sensor, an LED and a switch, then how to create triggers based on these items to turn on the LED under certain conditions. The parts needed for this tutorial are quite cheap and readily available, that is why I have chosen them but you could just as easily change out the LED for a relay or the switch for a door sensor and control various items in your house. There is no end to the possibilities that you could create but if you need some inspiration why not check out some of these projects that others have created.
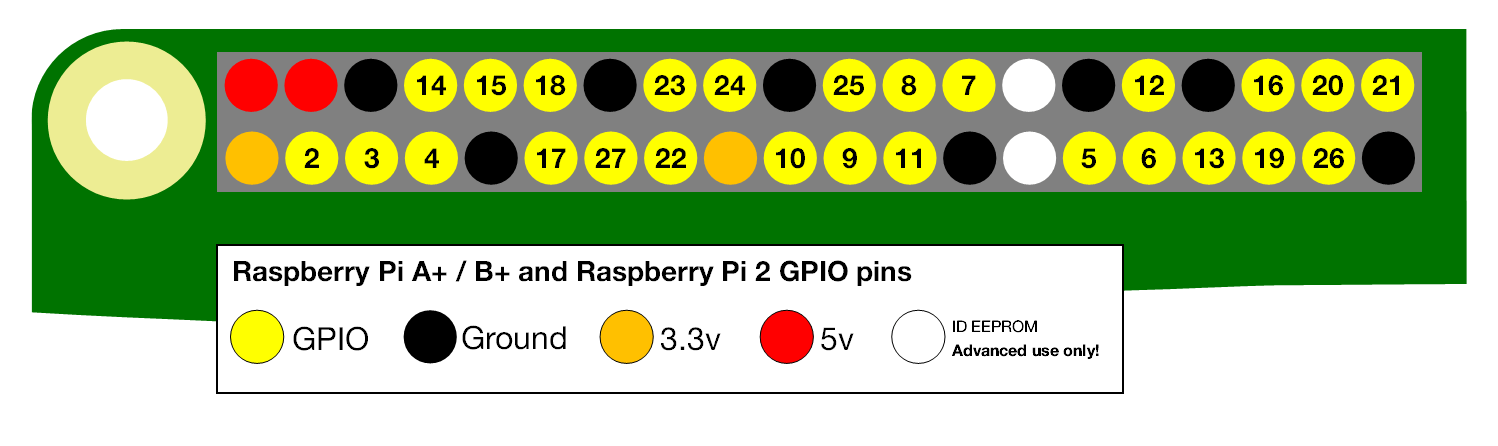 This tutorial assumes that you have done the basic setup of your Pi and that you are running Raspian as your operating system, if you haven’t done this yet then check out this article on how to setup your Raspberry Pi, it also assumes that you have an internet connection and will be using the Broadcom pin numbering convention as shown here.
Equipment
Required Materials:
- Raspberry Pi
- 8gb Micro SD Card
- Ethernet Cord or Wifi dongle (Pi 3 has inbuilt WiFi)
- PCB Mounted DS18B20 Temperature Sensor (or external)
- 4.7kΩ and 330Ω Resistors
- PCB mini slide switch
- Breadboard
- Jumper Wires
Optional:
- USB Keyboard
- USB Mouse
- Adafruit T-Cobbler Plus (optional)
Setting Up the Raspberry Pi and Cayenne
Setting up your Pi with Cayenne is surprising easy can can be achieved in just a couple of steps.
- Head on over to the myDevices website and select the “Sign Up Free” button in the top right corner.
- Once you have entered your information and logged in you will be asked to select what kind of device you are using, select the Raspberry Pi
- You will now be presented with a screen that shows the 2 ways that you can connect your Pi, in this case I will assume that you are using the SSH technique. Log into your Pi and execute the following 2 commands.
sudo bash rpi_xxxxxxxxxx.sh -v
This will load the cayenne agent onto your Pi and perform a restart. After the restart your Cayenne webpage should now update and you will see your connected Pi and a basic dashboard showing some data from the board.
Adding a DS18B20 Temperature Sensor
Now that we have our Pi connected to Cayenne we can go ahead and add a temperature sensor, the first thing that we need to do is build the DS18B20 circuit on a breadboard and connect it to the Pi. If you are not too sure how to do this then read the my article on connecting a temperature sensor, this will show you how to –
- connect the circuit
- setup 1-wire connectivity
- check the device slave value (eg.28-031674a9e9ff)
Make sure that you have de-powered the Pi before making any circuit connections.
When you have powered up the Pi again the temperature sensor should now be visible on your Cayenne dashboard, if it isn’t then you can add it manually by performing the following actions
- Select the “Add New” drop down menu in the upper left corner of the dashboard
- Select “Device/Widget”
- From the drop down menu select “Sensors”, then “Temperature”
- Select the DS18B20 temperature from the list of supported sensors
- Enter the device slave value (eg. 28-031674a9e9ff) in the box on the right hand side
You can change the settings by clicking on the gear icon for the sensor, in the popup you can make changes to personalise and identify the sensor by changing it’s name, number of decimal places and the measurement unit, be it Fahrenheit, Celsius or Kelvin. The other option that you have is whether to display the result as a value, gauge or graph. When presenting your data as a graph you also have the option to view and download a range of preset values or setup you own custom time frame.
Adding an LED and Switch
Cabling an LED and switch to the Raspberry Pi and adding it to Cayenne is very easy to accomplish, first we need to create a simple circuit, if you haven’t connected anything to the GPIO ports of your Pi before then have a look at this tutorial for connecting an LED and a Button to your Pi for some background on what is involved. In this example I will use a simpler circuit with just an LED, switch and resistor as shown below.
- Connect a 330Ω resistor to GPIO port 17
- Connect the +ve (long) leg of the LED to the resistor
- Connect the -ve (short) leg of the LED to ground
- Connect the 3.3V output through the switch to GPIO port 27
With the circuit created it’s now time to add the LED to the Cayenne dashboard –
- Select the “Add New” drop down menu in the upper left corner of the dashboard
- Select “Device/Widget”
- From the drop down menu select “Actuators”, “Generic”, then “Digital Output”
From the right hand side entry boxes
- Select a name for the widget
- From “Connectivity” select “integrated GPIO”
- From “Channel” select “Channel 17”
- Chose “Widget”, “button”
- Select an Icon
- Select “Add Actuator”
Repeat the process to create a “Digital Input” for the switch –
- Select the “Add New” drop down menu in the upper left corner of the dashboard
- Select “Device/Widget”
- From the drop down menu select “Sensors”, “Generic”, then “Digital Input”
From the right hand side entry boxes
- Select a name for the widget
- From “Connectivity” select “integrated GPIO”
- From “Channel” select “Channel 27”
- Chose “Widget”, “2-state”
- Select “Add Sensor”
Now select your Raspberry Pi from the left hand menu to return to the dashboard, you will now have a clickable button that will turn the LED on and off and a digital input showing the current state of the switch.
Creating Triggers/Events/Alerts
Now that we have all of our items connected it’s time to take advantage of Cayenne by creating some simple rules, in this example I will show you how to use the temperature sensor to trigger the LED to switch on and off at set temperature points and then do the same with the switch to give us manual control of the LED.
First we will create a trigger to activate the LED when the temperature sensor drops below 20°C
- Select the “Add New” drop down menu in the upper left corner of the dashboard
- Select “Trigger”
- Give the trigger a name
- On the new screen drag and drop your Pi from the left hand side and place in both the “if” and “then” boxes
- From the “If” box dropdown select the temperature sensor and set a value (ie 20°C)
- Select the “Temperature Below Option”
- From the “then” box dropdown select the digital output on channel 17 and set to “on”
- Save trigger
Repeat the process to turn the LED off when the temperature reaches 25°C by setting the temperature value and selecting the “Temperature Above” option, also set the digital output on channel 17 to “off”. Once both of these triggers are set you will see that the LED will turn on and off according to the current temperature.
To create the switch trigger you first need to disable the temperature triggers so that there are no conflicts, this can be done by clicking the green slide switch on the right hand side of your triggers page. Repeat the above steps but this time rather than selecting the temperature sensor in the “If” section as the trigger, choose the “Digital Input” on channel 27 and set it so that when it is on the LED is also on. You have now created a simple manual switch digital input trigger.
It is also possible to add “Events”, these are basically time and date based triggers so that you can set actions to occur as a one off or set it up to repeat particular actions on a set schedule. One of the other options is to receive a notification either by email or SMS when certain triggers happen. In the example above rather than turning on the LED when the temperature gets too low we could get Cayenne to send an email to a specified address, by selecting “setup notification” in the “then” box of the triggers page and then entering the required details, of course, by setting up 2 triggers we could also have Cayenne perform both actions for us.
Create a Specific Project Dashboard
In the event that you have several Pi’s connected to Cayenne or if you are running a wide range of sensors and outputs, you may find that the main dashboard becomes quite cluttered, if that the case then it may be advantageous to setup different project dashboards. This is quite easy to accomplish by selecting the “add project” button at the top left hand side of the screen, Give your project a name and this will create a new blank dashboard, from here you can drag and drop the particular devices that you require from the left hand side menu.
Conclusion
As I said before if writing code really isn’t your thing then Cayenne is a great way to implement you IOT project, it’s very quick to setup quite intuitive to use, and as I hope I have shown with this example can be very powerful when it comes to monitoring and triggering actions based on real world inputs.
There are however some limitations to the software at the moment, obviously the software doesn’t support all of the sensors that are currently on the market, the software is still fairly new so I am sure that with time and there work with hardware manufacturers that this list will increase rapidly. Another limitation is that Cayenne doesn’t currently support multiple condition statements, for example, with the triggers that we created in this tutorial we were not able to make the LED turn on if the temperature was below 20°C “OR” the if switch was “ON”, meaning that we can’t configure a manual override switch as the triggers would conflict. I also noticed that with digital inputs it is not possible to set the internal pull-up/pull-down resistors that are built into the Pi on the GPIO pins, meaning that the pin can float and sometimes produce inconsistent results, this however can be easily overcome by adding an external resistor.
Cayenne has a very strong community and the creators are working on adding extra functionalities so I sure that in the future all of these limitations will be addressed.
In my opinion Cayenne is a great product and what it claims to do, it does very well, going forward I can only see this product improving as they receive more feedback and add more features.
If you have any thought’s about this article, improvements or errors let me know in the comments below and if you found this helpful, why not share it with others.
wow! You have just opened my world of imagination. I have honestly never heard of this names before. After reading your blog, I am hooked on this new knowledge My mind is not racing to figure out what I might use these know to achieve. I have gone over to rasperry pi and cayenne websites to dig deep. Thanks for helping to spread this knowledge to the world. I will report back what I my project will be focused on. I am really interested in motion activated stuff and security.
Glad to hear you found it interesting