Raspberry Pi Initial Setup
Raspberry Pi “Jessie” Setup
If you’ve never heard of a Raspberry Pi Computer (RPi) before then I suggest that you head over to the Raspberry Pi Foundation and familiarise yourself with who they are and what they do. With over 5 million of these little micro computers out in the wild there is a wealth of information available and a very strong community. For a quick overview head here first.
When it comes to the operating system there are many options, you can buy preloaded SD cards with the latest version of Raspian Jessie, or the New Out Of the Box NOOBs operating system installer. You can also download your own image of Raspian or NOOBs and load it onto an SD card yourself. A helpful program for loading the operating system is Win32DiskImager, if you need to format your SD card first then try SD Formatter.
There are many other operating systems available for the RPi but for the purpose of this discussion I will be referencing Raspian as this is the OS recommended by the foundation.
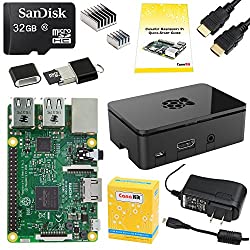
These days there are several Raspberry Pi kits available that give you all the basics you’ll need to get started prototyping projects.
In order to configure the Raspberry Pi there are a few items that you will need to get started:
- Raspberry Pi (RPi)
- 8GB Micro SD Card (min) running the latest version of Raspian or NOOB’s
- Power Supply
- Ethernet Cable or Wi-Fi Dongle (wi-fi is built in for latest Raspberry Pi 3)
- HDMI Cable (optional)
- Monitor (optional)
- USB Keyboard (optional)
- USB Mouse (optional)
- SSH software (Putty)(optional)
The Raspberry Pi organisation provides excellent tutorials on initially connecting your Pi and setting up NOOB’s.
Assuming you have the operating system loaded on your RPi you will need to connect it to the internet via the Ethernet cable or Wi-Fi, connect the power, monitor, keyboard and mouse.
With the monitor connected and after powering up you should be presented with the desktop screen, in the top left corner select Menu/Accessories/Terminal you will be presented with a command line prompt pi@raspberrypi ∼ $, type in the following command and press enter.
If you are setting up your RPi in a headless configuration (i.e. no monitor or keyboard) then you will also need to load some communications software to your PC to access the RPi. A free piece of SSH software that you can use is Putty, this is a terrific little tool and is available for both Windows and Mac. If you are using a headless setup then you will also need to know the ip address of your RPi so you can connect it with Putty, this can be done in several ways depending on your setup so if you need some help I recommend going here and following the instructions.
When you have successfully connected to your RPi you will be required to enter a username and password, the standard for new installs is as follows
Password = “raspberry”.
You will now be presented with the command prompt pi@raspberrypi ∼ $, type in the following command and press enter.
If all has gone well, whether headless or not you should now be met with the following configuration screen.
This is all fairly self explanatory but in order to build this project you will need to enable some specific settings.
1. Expand Filesystem – Press enter to execute this option to fully utilise all the space on your SD card (8GB)
2. Change User Password – Unless you have a particular need to I would leave this as the default password. If security is high on your list of priorities then select the option and follow the prompts to change your password.
3. Boot Options – This is personal preference but I like to get the system to boot to Desktop Autologin as there is an icon on the desktop to access the command-line prompt.
4. Wait for Network at Boot – Select Fast boot without waiting for network connection. We want our project to run automatically even if it doesn’t always have a network connection.
5. Internationalisations Options – Here you can setup the RPi to better represent where you are in the world. There are 4 options:
I1. Change Locales – Configure you RPi with your preferred language, by default it is configured to en_GB.UTF-8 UTF-8 meaning English_GreatBritian.Universal Coded Character Set Transformation Format – 8-bit. Just chose the locale that best represents you using the UTF-8 option by default where possible.
I2. Change Timezone – Here just select your continent, then the most appropriate city for you and the RPi will do the rest.
I3. Change Keyboard Layout – If you know the type of keyboard that you are using then feel free to change it, otherwise just leave it as the default Generic 105-key (Intl) PC
I4. Change Wi-Fi Country – Simply pick your country from the list.
6. Enable Camera – For this project the camera won’t be required
7. Add to Rastrack – If this is you first RPi then why not go ahead and add yourself to the online map, as it says it’s just a bit of fun.
8. Overclock – Overclocking will not be needed for this project.
9. Advanced Options – Here we will need to make some changes.
A2. Hostname – The default is “raspberrypi” if you would like something that helps you better identify your RPi then this is the place to do it.
A4. SSH – This is enabled by default and should remain so to ensure remote connection via Putty as ultimately the pool monitor will be headless.
A7. I2C – This will be required to communicate with the Ph, ORP and Salinity sensors so must be enabled, when you are asked if you would like to load the I2C kernel by default select “yes”.
Select finish from the configuration tool and you will be asked if you would like to reboot now, select “yes” and wait for the RPi to reboot.
While this approach will work whether you are using SSH or the RPi desktop if you are using the desktop it is possible to access all of these configuration settings via Menu/Preferences/Raspberry Pi Configuration.
Once this is completed if you are using Putty log back in, if your RPI has it’s own monitor and you selected “boot to Desktop Autologin” then in the top left corner select Menu/Accessories/Terminal and you will be presented with a command line prompt.
Finally we will do some housekeeping and ensure that our RPi software is up to date. To do this from the command line prompt enter the following commands
sudo apt-get dist-upgrade
When running sudo apt-get dist-upgrade, it will show how much data will be downloaded and how much space it will take up on your SD card. It’s worth checking with df -h that you have enough disk space free. Be aware that this command could take quite some time.
This command will remove all the archive files from /var/cache/apt/archives and free up some space on your SD card.
That’s it, you should now have all the basic setup of your RPi completed.
Any thought’s, improvements or errors let me know in the comments below.

0 Comments