Soldering Techniques for Raspberry Pi Projects
Soldering Basics
Soldering is one of the skills that can really expand what you are able to do as an electronics hobbist and fortunately it not difficult to learn. By practicing some basic techniques you can open up a whole world of new projects with your Raspberry Pi.
Soldering Iron Types
There are a few different types of soldering irons to chose from depending on the job you want to do
- Soldering Iron (Non Temperature Controlled)
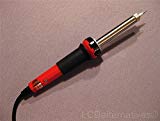
![]() Non temperature controlled soldering irons have a lower wattage than soldering guns and can be purchased very cheaply, if you are just starting out this can be a viable choice, however if you intend to solder anything more than passive components (eg. resistor, capacitors etc.) then you do risk overheating more sensitive electronic components. The lack of temperature control can also lead to poorly formed joints, in my opinion the cheap price does not make up for the frustration caused by damaged parts and faulty circuits.
Non temperature controlled soldering irons have a lower wattage than soldering guns and can be purchased very cheaply, if you are just starting out this can be a viable choice, however if you intend to solder anything more than passive components (eg. resistor, capacitors etc.) then you do risk overheating more sensitive electronic components. The lack of temperature control can also lead to poorly formed joints, in my opinion the cheap price does not make up for the frustration caused by damaged parts and faulty circuits.
- Soldering Iron (Temperature Controlled)

![]()
Temperature controller soldering irons are the best choice when it comes to working on electronic circuits. The ability to control the heat at the tip allows you to solder a wide range of components without risking damage. A temperature controlled iron has a thermostat which switches off the heater when the selected temperature is reached. This means it can have a more powerful heating element, so it heats up faster. When the iron is not in use the element is switched on just enough to maintain the set temperature and does not overheat, maintaining a better tip surface. Plus you can set the temperature to match the kind of solder you are using (hotter for lead-free). This functionality will cost you a little more, but this is one of those occasions when it is completely worth it, If you are a beginner this style of iron will save you a lot of frustration and speed you up through your learning curve.
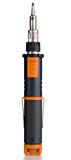
- Portable Soldering Iron (Gas Powered)
![]()
A gas powered soldering iron is ideal for working in locations where there may be no mains power supply available or for quick repairs. They can reach into equipment without having to trail a power cord, so they work well in difficult or inaccessible areas. Gas soldering irons are butane powered meaning they can be refilled with common cigarette lighter butane aerosols. The temperature of the tip can be controlled by adjusting the gas flow, Butane irons sometimes also have additional attachments that can be useful such as a hot-air nozzle (suitable for heat shrinking) and a blow torch or hot knife (for sealing polythene, cutting and sealing nylon rope).
Finally I will mention that most modern soldering irons come with the ability to change out the tips, this is helpful as it allows you to change the size and shape of the tip. As a general rule when soldering wires or larger gauge items you should use a large tip, this will allow more heat transfer and solder the area more evenly. When soldering smaller electronic a smaller tip should be used, it should still be capable of transferring enough heat to the component to solder the joint in 2-3 seconds so that you don’t overheat and damage the electronics.
![]()
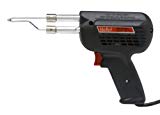
The soldering gun has a much higher voltage is generally used for larger jobs that require a lot of heat. These are great if you intend to solder heavy components or thick wire, they should not however be used on sensitive electronic circuitry as the higher heat that is produced can cause damage.
Solder Types
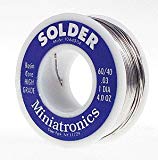
Solder is basically metal wire with a “low” melting point, where low for our purposes means low enough to be melted with a soldering iron. For electronics, it is traditionally a mix of tin and lead. Tin has a lower melting point than Lead, so more Tin means a lower melting point. A flux core is also used in electronics solder as molten metal doesn’t like to “stick” to oxidized or oily surfaces. Generally rosin is used, this has a lower melting point than the solder and serves to clean the surface to encourage a good bond.
![]()
The other type of solder you may come across is Lead-Free, lead-free solder is an evolution of solder meant to be more environmentally friendly. The issue is that lead is used to reduce the melting point in normal solder, so now different metals are used instead which aren’t as effective. From the hobbyists point of view you can use lead-free and lead-based solder interchangeably, but lead-free solder is a bit harder to work with because it doesn’t flow as nicely or at as low a temperature as its lead-based equivalent, this can generally be overcome by increasing the temperature of your soldering iron.
Soldering Iron Tip Cleaning
![]()
It is very important to keep the tip of your soldering iron clean and free of oxidation as this helps to ensure that there is a good heat transfer between the iron, component and the pad. Achieving this is as simple as using a replaceable wet sponge however this can lower the tip temperature when going from soldering to cleaning frequently. Another option is to use a “brass sponge”, this is basically a brass wool which will effectively remove excess solder and remove any oxidation on the tip without lowering the tip temperature.
Optional Accessories
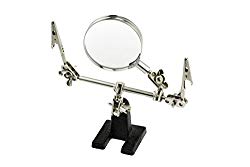
![]()
- Wire Cutters
- Solder Sucker Desoldering Pump
- Desoldering Wick, solder braid
- Helping Hands
- Magnifying Glass
- Safety Glasses (Not really optional)
All of these items while not strictly necessary will greatly enhance and simplify your experience when it come to learning how to solder.
So now that we have all our equipment it’s time to start looking at the basic techniques for soldering.
So you have a good soldering iron, the right solder and a cleaning pad, your halfway there, now you just need to follow a couple of important points and you will get good solder joints. Modern soldering iron tips tend to have special coatings, this is good because it prevents the oxidizing so you should never file or sand your tip to clean it.
Cleaning your soldering iron can just mean wiping the tip on your cleaning pad a couple of times, but if your iron has been sitting for a few minutes and you notice that the tip of your iron starts to turn a grayish color then you have oxidation. The problem with oxidization of the tip is that it greatly reduces the heat transfer, the key to avoiding this is to keep the tip clean and tinned regularly.
In order to tin the soldering iron you need to take your hot iron, wipe the tip on a cleaning pad and then immediately melt plenty of solder all over the tip (expect drips), this will produce a “shiny” un-oxidized tip, once this is done you are ready to solder your components. This process should be completed often when soldering to ensure you are getting the best heat transfer and therefore joints.
Now the idea with soldering is you want to get both of the things you are joining hot and then introduce solder. Don’t load up the tip with solder and try to transfer it to the joint. You should touch both components that you want to join with the tip at the same time, hold it there for a couple of seconds then from the opposite side introduce the solder, it will melt when it touches the iron, as soon as you see the solder flow into the joint, lift the soldering iron away. To do this process well it is helpful to use some “helping hands” to secure the parts while you have one hand for the solder and the other for your iron.
Now if you have followed all the tips above you have given yourself the best chance of making a good connection, however after each joint it is important to check for any problems. A cold solder joint can occur when not enough heat is applied to the component, board, or both. This can be a problem especially when trying to solder to “ground planes”, these are large areas of copper on a circuit board that can dissipate heat more quickly than the soldering iron can supply it, to overcome this you either need a hotter iron or a temperature controlled soldering iron that allows you to increase the temperature to overcome this. Another common cause of bad jointing is a component moving before the solder has completely cooled and solidified. A cold joint is brittle and prone to physical failure. It is also generally a very high resistance connection which can effect the operation of the circuit or cause it to fail completely. Also don’t forget to have something on your work surface so that any solder drips don’t damage your bench.
Hopefully you now have the confidence to start soldering your own circuit boards and making some great new projects with you Raspberry Pi. As you can probably tell from this article I am a big fan of temperature controlled soldering irons, why not check out my review of some of the best value soldering irons currently available.
If you have any thought’s about this article, improvements or errors let me know in the comments below and if you found this helpful, why not share it with others.
Great article with lots of good information. I don’t consider myself very good at soldering, but I do have a great story…
Years ago I bought a used Thinkpad laptop from eBay and all was well – until I decided to reinstall it. Turns out the BIOS had an administrator password set so I was locked out, and left with a very expensive brick! Also, Thinkpads do not have a way to reset this admin password – it is stored on an EEPROM chip on the motherboard. The only way to revive the machine was to replace the EEPROM!
I tried to find a company – any company – to do this for me, but no one would even attempt it. So, me being the stubborn one said, “Fine! I will do it myself!”, after all, what did I have to lose at that point?
I ordered a new EEPROM from eBay and I was on my way… I had to disassemble the entire system to get to the offending EEPROM. The new EEPROM was only about 1/4″ square, and when I looked at it, I thought it had 3 pins on either side – WRONG! Looking at it with the magnifying glass showed that there were, in fact, 5 pins on each side!
I took my soldering iron, and my desolder braid and started to work. Getting the old chip off was fairly easy, but soldering the replacement EEPROM was tense, to say the least.
I am happy to report that after I got everything reassembled, and turned on the machine – IT WORKED! I used the laptop for about 5 more years before it was just too old ?
Hi Nancy
Great story, can’t say I have ever had to try and replace anything that delicate yet but congratulations on getting it all working.
Dom
Hi there. Thank you for providing a very in-depth article here. There are lots of interesting points you have made. My hobby is definitely electronics so I could benefit from this for sure. What I like about non temperature controlled soldering iron is that is very cheap and very easy to use.
Hi Karlo
I agree that the non-temperature controlled irons are cheap but you really do get what you pay for. I would highly recommend spending that little bit extra on a temp controlled one as it makes all the difference when working on delicate parts, but that just my opinion. Good luck with your future projects
Dom