Raspberry Pi Pool Monitor – Python Code
HydroPi Pool Monitor Code
This Raspberry Pi pool monitor code will allow you to manage multiple sensors and relays and send email alerts among other things. This program pulls together several other posts that I have written, if you are curious then I suggest you look at this overview of the project.
The program relies on several prerequisites to have been previously configured on your Pi. I am assuming that you are running the latest version of Raspian and have the ability to connect to your Pi either through SSH with putty and FTP with filezilla, or directly with a keyboard and monitor, if you haven’t set-up your Pi yet then check out my getting started section.
The program requires that you have the following installed
- At least one connected sensor
- At least one relay
- MySQL
- PHPMyAdmin (optional but recommended)
The Code
The program is available in both 2.x and 3.x in the MyHydropi Github Repository in the folder pool-monitor.
To get the pool monitor up and going there are several places where you need to change values to allow for your own specific setup. Once done the program will create the MySQL database automatically for you. If you add or remove sensors, relays, or change the number of timer pairs at a later date you can just change the settings, reboot and the database will be updated.
Before running the program you will need to configure some details that will be specific to your setup. The first thing that you will need to configure is your login to the MySQL database, you need to provide your username (at setup this is root), your password to the database and the name you have chosen for your database (“hydropi” is the default).
# Define MySQL database login settings
servername = "localhost"
username = "YourMysqlUsername"
password = "YourMysqlPassword"
dbname = "hydropi"
Next we will configure the relays, here we will define the GPIO ports that the relays are connected to and the number of date time pairs that we are going to be using for each relay. More information on how I have setup date time pairs for timing can be found here.
# Define Relay Settings
outputpins = [22, 23, 24, 25]  # Specifiy a RPi GPIO Pin for each relay
numdtpairs = [4, 3, 2, 4]  # Number of Start/Stop pairs for each relay
relaycount = range(1, (len(outputpins) + 1))
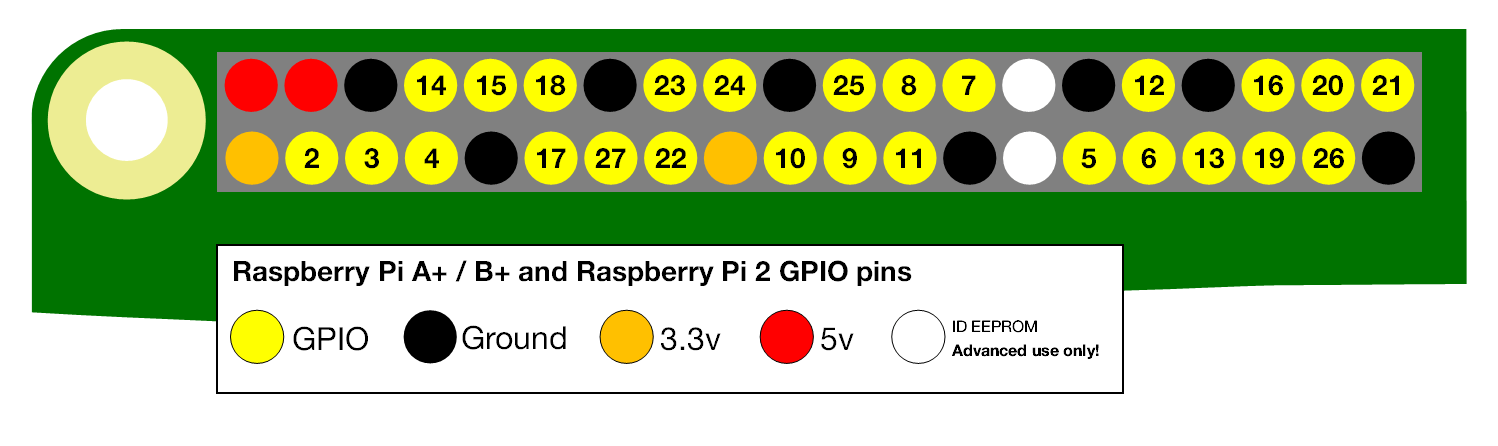
The “outputpins” variable lists the GPIO pins on the Pi that you have connected to your relays, for pin numbering I am using the following convention
The “numdtpairs” variable sets the number of start/stop times for each individual relay, in theory you could set multiple start/stop time for every day of the year but there is no real limit. Finally the “relaycount” variable will count the number of “outputpins” you have added and assume that this is the number of relays connected.
Each relay must have a value entered in “numdtpairs” even if it is just a 0, when you run the program it will check to see that you have done this and provide a warning if something goes wrong. At startup all the relays will be set to off and the date time pairs will be empty, these will need to be added via the MySQL command line or PHPMyAdmin. I have also created some webpages that will allow you to see and update these values easily through your browser.
The program is written to use DB18B20 temperature sensors and various Atlas Scientific sensors, in order to configure each sensor for your specific setup the following code needs to be edited.
# Configuration Settings
sensors = OrderedDict([("temp_1", {  # DS18B20 Temperature Sensor
                            "sensor_type": "1_wire_temp",
                            "name": "ds18b20_temp",
                            "is_connected": True,
                            "is_ref": False,
                            "ds18b20_file":
                            "/sys/bus/w1/devices/28-xxxxxxxxxxxx/w1_slave",
                            "accuracy": 1,
                            "test_for_alert": False,
                            "upper_alert_name": "ds18b20_temp_hi",
                            "upper_alert_value": 50,
                            "lower_alert_name": "ds18b20_temp_low",
                            "lower_alert_value": 10}),
                       ("atlas_sensor_1", {  # Atlas Scientific Temp Sensor
                            "sensor_type": "atlas_scientific_temp",
                            "name": "atlas_temp",
                            "is_connected": True,
                            "is_ref": True,
                            "i2c": 102,
                            "accuracy": 1,
                            "test_for_alert": False,
                            "upper_alert_name": "atlas_temp_hi",
                            "upper_alert_value": 40,
                            "lower_alert_name": "atlas_temp_low",
                            "lower_alert_value": 25}),
                       ("atlas_sensor_3", {  # Atlas Scientific EC Sensor
                            "sensor_type": "atlas_scientific_ec",
                            "name": "ec",
                            "is_connected": True,
                            "is_ref": False,
                            "i2c": 100,
                            "accuracy": 0,
                            "ppm_multiplier": 0.67,  # Convert EC to PPM
                            "test_for_alert": True,
                            "upper_alert_name": "ec_hi",
                            "upper_alert_value": 6000,
                            "lower_alert_name": "ec_low",
                            "lower_alert_value": 4500}),
                       ("atlas_sensor_4", {  # pH/ORP Atlas Scientific Sensor
                            "sensor_type": "atlas_scientific",
                            "name": "ph",
                            "is_connected": True,
                            "is_ref": False,
                            "i2c": 99,
                            "accuracy": 2,
                            "test_for_alert": True,
                            "upper_alert_name": "ph_hi",
                            "upper_alert_value": 7.4,
                            "lower_alert_name": "ph_low",
                            "lower_alert_value": 7}),
                       ("atlas_sensor_5", {  # pH/ORP Atlas Scientific Sensor
                            "sensor_type": "atlas_scientific",
                            "name": "orp",
                            "is_connected": True,
                            "is_ref": False,
                            "i2c": 98,
                            "accuracy": 0,
                            "test_for_alert": True,
                            "upper_alert_name": "orp_hi",
                            "upper_alert_value": 700,
                            "lower_alert_name": "orp_low",
                            "lower_alert_value": 550})])
This code describes each type of sensor that you can attach, while there are common elements each is slightly different, the following are common elements to each
- “sensor_type” – the program treats each sensor type slightly differently so this should not be changed, if you have multiple sensors of the same type this setting should be same for each.
- “name” – user defined sensor name assigned to database, if you have more than one of the same sensor then different names are required.
- “is_connected” – sets if the sensor is in use, if set to false then that sensor will be ignored allowing you to remove a sensor without removing all the code.
- “is_ref” – to read accurately some of the sensors are temperature dependant, the reference temperature sensor should be the one you have in the liquid that your are monitoring, if no reference is set then 25C will be used. Only one reference temperature sensor may be set, on startup the program will check this is true and give you a warning if it is incorrect. All other sensor types should be set to false.
- “accuracy” – This sets how many decimal points of accuracy are recorded when reading the sensors.
- “test_for_alert” – this sets whether an email is sent based on the alert values for this sensor, if set to false then no email will be sent if the alert values are exceeded.
- “upper_alert_name” – database column name for the upper alert value.
- “upper_alert_value” – upper limit value for that sensor, will trigger an email alert if exceeded.
- “lower_alert_name” – database column name for the lower alert value.
- “lower_alert_value” – lower limit value for that sensor, will trigger an email alert if exceeded.
Atlas Scientific Sensor specific:
- “i2c” – Defines the specific i2c address for each of the Atlas Scientific sensors.
DB18B20 specific:
- “ds18b20_file” – defines the location of the data received from the ds18b20 temperature sensor.
Electrical Conductivity specific:
- “ppm_multiplier” – used to convert the electrical conductivity reading to a parts per million value.
If you want to add more than one of a specific sensor type then you simply need to make a copy of the existing sensor setting and add it into the “sensor” variable above and give it a new “name” variable.
eg. adding the following to the “sensors” variable would create a 2nd temperature sensor in the database
("temp_2", {  # DS18B20 Temperature Sensor
     "sensor_type": "1_wire_temp",
     "name": "ds18b20_temp_2",
     "is_connected": True,
     "is_ref": False,
     "ds18b20_file":
     "/sys/bus/w1/devices/28-yyyyyyyyyyyy/w1_slave",
     "accuracy": 1,
     "test_for_alert": False,
     "upper_alert_name": "ds18b20_temp_hi_2",
     "upper_alert_value": 100,
     "lower_alert_name": "ds18b20_temp_low_2",
     "lower_alert_value": 75}),
There are also some miscellaneous settings
# Define other settings
misc_setting = {"pool_size": 27000,  # Pool volume in litres
                "offset_percent": 2,
                "pause_readings": False,
                "read_sensor_delay": 300,  # 60x5 = 5 Minutes
                "pause_reset_delay": 1800,  # 60x30 = 30 Minutes
                "email_reset_delay": 172800,  # 60x60x24x2 = 2 Days
                "to_email": "ToEmail@Address.com"}
- “pool_size” – not used by the program itself but rather by the associated webpage to calculate chemical dosing amounts.
- “offset_percent” – to prevent the alert email being sent multiple times when a sensor is reading near a limit this sets a slightly higher or lower reset limit.
- “pause_readings” – delays sensor readings for a set amount of time (in seconds) while adding chemicals to prevent spikes in the readings. (helpful when displaying the readings in a graph)
- “read_sensor_delay” – delay (in seconds) between sampling all the sensors.
- “email_reset_delay” – sets the delay (in seconds) between reminder emails when the sensors are out of limits and corrective action has not been taken.
- “to_email” – sets the email address to send the alerts to.
All of the above settings are written to the database so that once the program is up and running changes can be made manually and the program will operate with the new values without the need to stop and restart the software.
Finally for the email alert to work correctly you need to enter you own relevant details. If you need more information on how to setup and send an email with your Pi then you can find instructions here.
    # Build email and send
    fromaddr = "FromEmail@gmail.com"
    toaddr = all_settings["to_email"]
    alladdr = toaddr.split(",")
    msg = MIMEMultipart()
    msg['From'] = fromaddr
    msg['To'] = toaddr
    msg['Subject'] = "Pool Alert"
    body = ("HinnThis is your PoolnnYou should know that the following "
    "sensor(s) are indicating that there is a problem that needs your "
    "attentionn{}nPlease check this by logging intonnwww.yourwebsite.com"
    "nn RegardsnnYour HydroPi").format(out_of_limit_sensors.upper())
    msg.attach(MIMEText(body, 'plain'))
    server = smtplib.SMTP('smtp.gmail.com', 587)
    server.starttls()
    server.login(fromaddr, "YourFromEmailPassword")
    text = msg.as_string()
    server.sendmail(fromaddr, alladdr, text)
    server.quit()
    return
In the above code you will need to enter your own details into the following lines
- fromaddr = “FromEmail@gmail.com”
- server.login(fromaddr, “YourFromEmailPassword”)
Once everything has been configured for your own personal setup the first time you run the program it should perform some basic checks to ensure that the data entered is suitable and then proceed to create the MySQL database, tables, rows and columns, input some default data and then continue to run indefinitely. The main program loop below basically just checks the relay settings every second and does all the timing and testing of conditions related to the other delays that have been configured and then calls the required functions.
#################
#               #
# Main Program  #
#               #
#################
# Sanity Checks
check_number_of_relays_equals_start_stop_pairs()
check_for_only_one_reference_temperature()
# Configure relay GPIO ports
set_GPIO_pins()
# Build/Remove MySQL Database Entries
create_database()
relay_timer_names = create_relay_tables()
create_timer_override_table()
create_sensors_table()
create_settings_table()
remove_excess_timer_override_and_relay_database_entries()
remove_excess_datetime_pairs()
remove_unused_sensors()
remove_unused_sensors_settings()
while True:  # Repeat the code indefinitely
    # Control the relays
    activate_deactivate_relays()
    sleep(1)
    # Check if sensor readings have been paused, if not then read and store
    # sensor values and check against alert values, send an email if required
    if loops == time_between_readings:
        loops = 0
        # Read delay values from settings table
        delays = get_settings_table_values()
        time_between_readings = delays["read_sensor_delay"]
        email_reset_loop = (delays["email_reset_delay"] //
                                    time_between_readings)
        pause_reset_loop = (delays["pause_reset_delay"] //
                                    time_between_readings)
        if delays["pause_readings"] == 0:
            alert_readings = read_sensors()
            if alert_check is True and email_sent is True:
                email_sent = reset_email_sent_flag_if_alerts_clear(email_sent)
                if email_sent is False:
                    alert_check is False
                    email_sent_reset = 0
            elif alert_check is False:
                alert_check = check_sensor_alert_limits(alert_check)
                if alert_check is True:
                    email_sent = send_email(alert_readings)
                    email_sent = True
                    email_sent_reset = 0
        elif delays["pause_readings"] == 1:
            pause_loops += 1
            if pause_loops == pause_reset_loop:
                reset_pause_readings()
                pause_loops = 0
        if email_sent is True:
            email_sent_reset += 1
            if email_sent_reset == email_reset_loop:
                alert_check = False
                email_sent_reset = 0
    loops += 1
While I wrote this program as a solution to my own needs I have tried to make it as versatile as possible so that if you just want to try it out you only need a single relay and sensor to get it going. However if you are looking for something to just control relays or just read sensors then I have also broken down the program to just provide the basics for each. All the python code is available in both 2.x and 3.x on the MyHydropi Github Repository in the folder pool-monitor.
If you have any thought’s about this article, improvements or errors let me know in the comments below and if you found this helpful, why not share it with others.
Hello Dominic,
I am using 3 DS18B20 Temperature Sensors, 1 for pool temp, 1 for air temp and 1 for heater temp. I created temp_2 and temp_3 in the sensors variable, but it only reads the temp_1 sensor and puts that value in all 3 rows in the db? How do I modify to read the temp_2 and temp_3 sensors. I gave them all unique names.
Thanks,
Jeff
Hi Jeff,
It’s not you it’s me, Looks like I still had the function – read_1_wire_temp_raw() hard coded with “temp_1” from the sensors dictionary, try changing the following lines and that should pass the right temp sensor name variable through, let me know if this helps.
Line 468 – def read_1_wire_temp_raw(temp_num):
Line 470 – f = open(sensors[temp_num][“ds18b20_file”], ‘r’)
Line 479 – def read_1_wire_temp(temp_num):
Line 481 – lines = read_1_wire_temp_raw(temp_num)
Line 485 – lines = read_1_wire_temp_raw(temp_num)
Line 534 – sensor_reading = (round(float(read_1_wire_temp(key)),
Dom