Connect a Camera to the Raspberry Pi
Raspberry Pi Camera
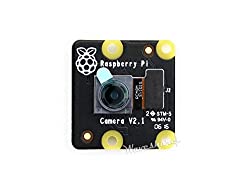
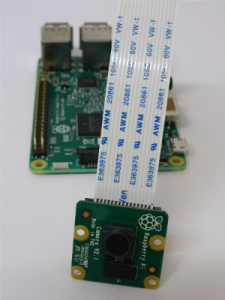 The Pi Camera from the Raspberry Pi Foundation is a great little unit that connects directly to your Raspberry Pi via a ribbon cable to the dedicated CSI (Camera Serial Interface), located just behind the Ethernet port. The Raspberry Pi Camera Board v2 is a high quality 8 megapixel, Sony IMX219 image sensor, fixed focus add-on board for Raspberry Pi. The Pi Camera also comes in a NoIR (No Infra Red) variant which allows the board to capture low light and night images. Both of these cameras support the following image and video qualities,
- up to 3280 x 2464 pixel static images
- 1080p30, 720p60, and 640x480p90 video
These cameras are both supported in the latest version of Raspbian and there is a pure Python interface to the Raspberry Pi camera module for Python 2.7 (or above) and Python 3.2 (or above) making it very easy to integrate into your Raspberry Pi camera projects.
Equipment
Required
- Raspberry Pi (Using the latest Raspian OS)
- Raspberry Pi Camera (with ribbon cable)
Optional
Connecting a Pi Camera
This tutorial assumes that you have already done the basic setup of your pi and are running the latest version of Raspian. The first step is to enable the camera, this can be done via the command line using the following command
select option 5 , “interfacing options”, and then option “P1 Camera”, then to complete the process perform a reboot.
The camera will now be enabled.
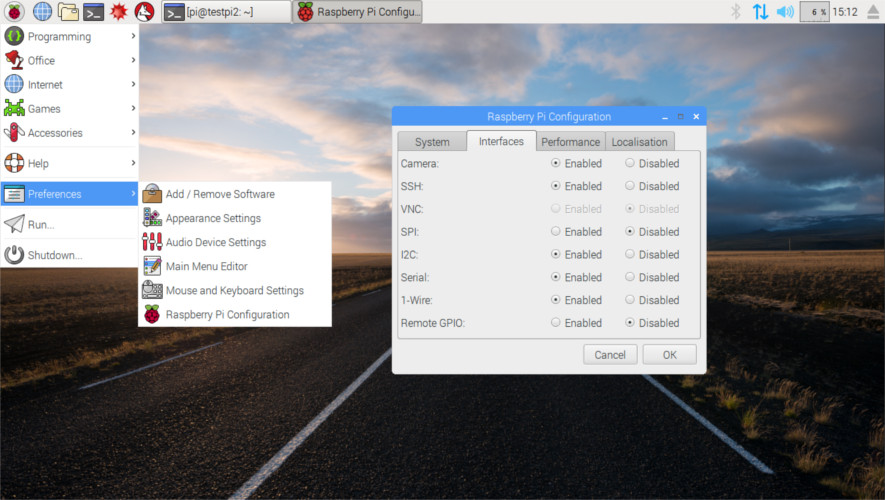
Alternatively if you have a monitor, keyboard and mouse connected you can use the desktop options, from the Pi symbol in the top left and select “Preferences” and then “Raspberry Pi Configuration”. When the popup menu appears select the Interfaces tab and then check the “enable” button for the camera as shown below and reboot.
With the camera enabled the next step is to add the Python Picamera module using the following commands,
sudo apt-get update
sudo apt-get install python-picamera
If you need the Python 3 version then use this package.
Capturing Images
Now that we have everything we need we can start writing some code to use the camera. We will start by using the basic preview and capture functions to show us what the camera sees and then take a photo.
from picamera import PiCamera
from time import sleep
camera = PiCamera() #  Start a camera class instance
camera.start_preview()
sleep(5) #  Allow camera to set light levels
camera.capture('/home/pi/Desktop/image.jpg') #  Take Picture
camera.stop_preview()
This simple program will activate the camera and show a preview on the screen (assuming you have a monitor connected) and then after 5 seconds it will take a photo an save it to your desktop.
Capturing Video
Using your Pi Camera to capture video uses a very similar process. The following code will create a 10 second video and save it to your desktop.
from picamera import PiCamera
from time import sleep

camera = PiCamera()
camera.start_preview()
sleep(5) #  Allow camera to set light levels
camera.start_recording('home/pi/Desktop/video.h264')
camera.wait_recording(10)
camera.stop_recording()
camera.stop_preview()
To play back the video that you just made execute the following command
It should be noted that in the above code I have used the command camera.wait_recording(10) instead of a simple sleep(10) command, this is because the wait_recording() command will continually check for recording errors (e.g. an out of disk space condition) while it is waiting, if you use the sleep() command then any problems won’t be discovered until the camera.stop_recording() command is executed.
PiCamera Settings
The Python PiCamera module has a wide range of different settings that you can configure and adjust using a python script, below are just some of the available controls.
camera.sharpness = 0
camera.contrast = 0
camera.brightness = 50
camera.saturation = 0
camera.ISO = 0
camera.video_stabilisation = False
camera.exposure_compensation = 0
camera.exposure_mode = ‘auto’
camera.meter_mode = ‘average’
camera.awb_mode = ‘auto’
camera.image_effect = ‘none’
camera.color_effects = None
camera.rotation = 0
camera.hflip = False
camera.vflip = False
camera.crop = (0.0, 0.0, 1.0, 1.0)
The module comes with such a wide range of options that they are to broad to discuss here fully, if you want to see more information and more advanced Python examples check out the official PiCamera documentation, there i’m sure that you will find what you need to take you projects to the next level.
With your camera connected why not put it into action by checking out these tutorials
How to Build a Raspberry Pi Security Surveillance Camera with MotionEye.
Web Cam Viewer – Use Flask to put your Pi data on the net
If you have any thought’s about this article, improvements or errors let me know in the comments below and if you found this helpful, why not share it with others.
Hi Dominic,
I had no idea what a Rasberry Pi was, but on further investigation through your website, it appears to me to be a modern version of the motherboard. Is this the case? I have rebuilt a few computers in my time, and the motherboard was always the centre of the unit, you just had to add a hard drive, power supply etc., any external devices would just be added with a cable.
Could you not do all the things that a Rasberry Pi does, by using a normal laptop/tablet, with the right software added? They come with a camera included.
Cheers
Hi Greg
The Raspberry Pi is a cheap ($35) all in one System on a Chip (SOC) computer designed to be used to learn about computing, coding and all the things that go into a modern computer, so yes a laptop would do all of these things but the Pi is about learning and cheaply implementing your own ideas and projects.
great article! I love how organized your information is and how easy it is to understand as I am new to Raspberry PI. This is pretty cool and it appears not very expensive.I just like the whole concept behind it. Pretty cool technology that allows you to learn which is pretty cool
Yep the Pi does make it easy to experiment and learn.
I have had a raspi zero w since January and I’m putting it in an old time camera. I have looked and failed at finding a code that will take a pic when I push the button. They all either don’t work at all or stop running after the pic is taken. I have added a power down code so I can use it without a mouse. I just can’t find the code I’m looking for. Can you or anyone in the Pi nation help point me in the right direction.
Thanks, Alex
Hi Alex
Try this little python 3 program, button_camera.py, you just need to connect the button between a gpio pin (set to 27 in the code) and 3.3V pin, set where you want to store the images and it will create the folder, name and save each image. If you hold the button down it will take a photo every second but you can set timing to your own preference.
Hopefully this is what your looking for, let me know how it goes.