Raspberry Pi Pool Monitor – Website
Pool Monitor Webpages
This Raspberry Pi pool monitor website makes controlling the associated Hydropi python code much easier. It will allow you to see current and average readings from multiple sensors, set relay timers and change settings. It will also provide you with recommended actions in the event that any readings are outside your set limits. If you want to find out more about this project then I suggest you look at this overview.
The program relies on several prerequisites to have been previously configured on your Pi. I am assuming that you are running the latest version of Raspian and have the ability to connect to your Pi either through SSH with putty and FTP with filezilla, or directly with a keyboard and monitor, if you haven’t set-up your Pi yet then check out my getting started section.
In order for the page to present properly you will need to have configured your Pi as a web server with MySQL. You will also need to be running the Hydropi python code as this will build the database based on your settings. The website reads this information from the database and then builds the webpage.
The website has been coded using PHP, JQuery and Bootstrap3 so that it is responsive for all screen sizes. All the code for the webpages can be found at the MyHydropi Github Repository in the folder Hydropi_Webpages. Copy all these files to your Pi into the folder /var/www/html and you should be almost good to go. The website needs to access the MySQL database so you will need to change the file – hydropi_connect.php – with your own login details and database name.
Main Page
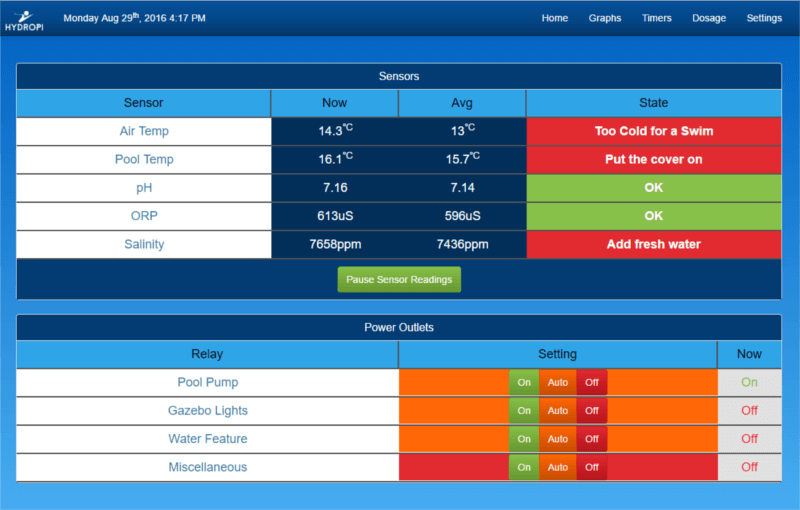
The main page (index.php) of the website consists of a couple of panels showing all of the currently connected sensors and relays. The sensors panel shows the latest and average readings for each sensor.
The average is calculated based on the readings from the previous day but only while the pool pump is on. I did this as my sensors are not directly in the pool but mounted in the external plumbing. I didn’t want readings that were taken while the water is not flowing past the sensors to be included. If you want to change the names of the sensors then you need to make changes to the file – sensor_webpage_names.php.
The “State” column compares the average values against the high/low settings and then based on the pool volume calculates what actions should be taken. eg. if the pH of your pool is to high it will recommend how much acid to add to correct the problem. All of the calculations use the metric system and are based on the chemicals that I am using. If you want to change the calculations and the responses you need to make changes to the file – sensor_check.php.
The “Pause Sensor Readings” button does exactly that, when clicked it will turn red and stop any readings being taken for a specified time. I use this when adding chemicals to the pool to prevent massive spikes in the readings which can affect the average and the graphs.
The power outlets panel manages the connected relays, again If you want to change the names of the relays then you need to update the file – relay_webpage_names.php. The relay settings column consists of 3 buttons that allow you to manually set the relay on/off or auto (timer controlled), the background colour will change to indicate the current setting and the adjacent column will show the actual state of the relay even when it is in auto mode. Finally this webpage is configured to update itself every 5 minutes so that it displays the latest information even when left open on the screen.
Graphs

This page (timers.php) charts the readings from all of the configured sensors using the freely available google charts. The default presentation when loaded is for one day but you can select to graph the readings over a range of time scales from the menu at the top. The names for each chart again come from the file – sensor_webpage_names.php. Each chart is created using the JavaScript file – hydropi.js under the function “drawChart”, to change the chart labels themselves you will need to change the names in those functions.
Timers
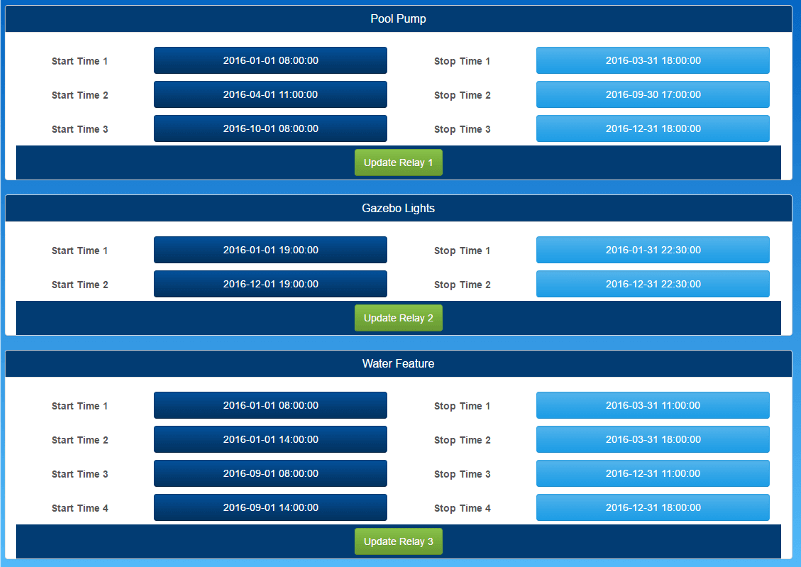
The timers page (timers.php) shows each of the relays and the number of date/time pairs that where set in the Hydropi python program, it will also automatically fill in any existing settings. To change the dates simply click on the relevant box and a date-picker will popup, the date-picker JavaScript is called Rome and has a range of different available configurations.
I have configured the date-picker to ensure that the stop time is after the start time but if you want to make you own changes to the style then you can update the file – initial_timer_data.php. Once you click the update button a popup will appear indicating that the database has been updated and the page will refresh with the new values.
Dosage
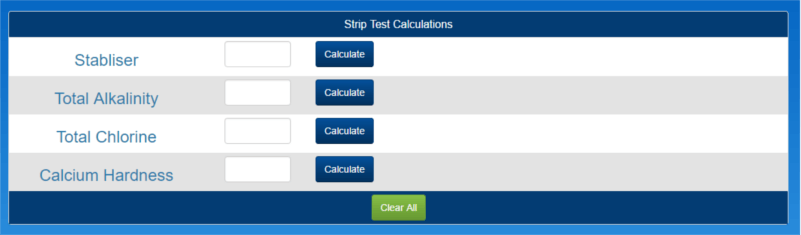
The dosage page (dosage.php) just calculates the amount of various pool chemicals that need to be added for manual tests that are not monitored by any of the sensors. Again all the calculations are metric and are hard coded into the page. To change this for your own use edit the 4 chemical_check_?? functions in the file – hydropi.js.
Settings
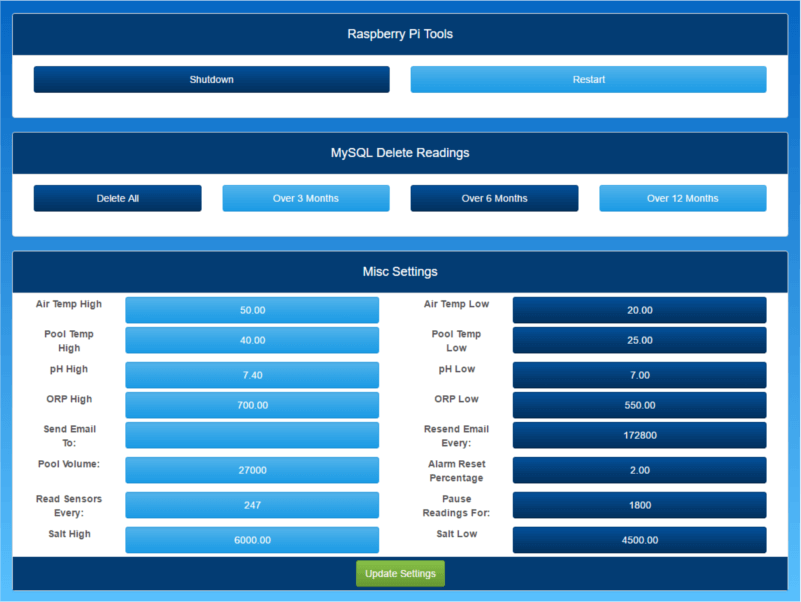
The settings page (settings.php) provides some control over the Pi itself. The ability to delete the sensor readings beyond a set time frame and to update the various settings that control the program. The first panel allows you to shutdown or restart the Pi remotely, to do this however requires giving permission on the Pi for the apache user (www-data) to execute these commands which could possibly compromise the websites security.
If this is a function that you would find useful log into the Pi and enter the following commands
at the bottom of the file under pi ALL=(ALL) etc. add the following line
You should now be able to use both of these buttons.
The next panel provides a simple way to delete some or all of the stored readings in the database in the event that disk space is at a premium. Finally the Misc Settings panel allows you to update all the alert values, set the timings (in seconds) between readings, emails and how long to stop the sensor readings when the button is pressed on the main page. Multiple alert email addresses can be added but need to separated by a comma. Multiple settings can be changed at once and when you click update a popup will appear letting you know that new values have been successful written to the database and the page reloaded.
Controlling access to your website
With the Pi configured as a web server, if you have linked it to a domain name it might be worth considering some basic security depending on what you are planning to use it for. To add a username and password to the apache website only requires a couple of steps and will help to limit access from both people and bots.
First we need to create a password file using the built in apache utility htpasswd, this will create an encrypted password file that you can name and store in a directory of your choosing, however the file should not be placed in a folder that is accessible from the web.
To create the file enter the following:
New password: mypassword
Re-type new password: mypassword
Adding password for user newuser
The htpasswd utility will ask you for the password, and then ask you to type it again to confirm it, this will create a file named passwords in the folder /home/pi/passwd containing the login credentials for “newuser” with the password “mypassword”. To configure additional users just drop the -c from the first line and repeat the other commands.
Next we need to configure the server to request this file when someone attempts to gain access to the website. To do this there are a couple of options but for basic access apache recommends editing the server config file using the following commands
sudo nano apache2.conf
This will open the server configuration file and allow you to make the appropriate changes. Scroll down towards the bottom until you see entries starting with <Directory>. Here we are going to add the details of the folder that we want to protect.
AuthType Basic
AuthName “Restricted Access” — This text will appear in the popup box when you access the website
AuthUserFile “/Your/Password/File/Location” — eg. from above “/home/pi/passwd/passwords”
require valid-user
</Directory>
You’ll notice the the first line describes the location of the folder that you want to protect, to save the server configuration file enter the following
y
To complete the process we need to restart the apache server with the following command
Once this is completed when you access your website you will now be met with a popup box requesting that you enter your username and password.
If you have connected the website to the internet then you can always access the page from your phone or tablet through the browser but if you are using it often it could be helpful to turn it into an app. It is quite easy to create a website app with the help of the tools over at AppsGeyser, just follow their 3 easy steps to set it up and you will have a one click way to access your site.
While I wrote these webpages as a solution to my own needs I have tried to make it as versatile as possible so that if you just want to try it out you only need a single relay and sensor to get it going. All the code is available from the MyHydropi Github Repository in the folder Hydropi_Webpages.
If you have any thought’s about this article, improvements or errors let me know in the comments below and if you found this helpful, why not share it with others.
Dominic,
Thanks for posting this. It’s really going to give me a good head start on my system for my pool. Going to modify it so I can control my heater and pool temp.
Thanks again for posting.
Jeff
Hi Jeff,
Glad your finding it helpful, good luck with your own project, let me know how it goes.
Dom
Dominic, Thanks again for the work on this!!. I am using a 16 Channel relay. As soon as I initialize more than 9 relays, I lose the individual relay on the Home page and the Timers page becomes blank. When I remove the relay’s above 9 the pages return. I am not sure if it is the php or the SQL that is causing the issue. When I query the SQL the relays 10-16 show up in the list before relay 1. Any thoughts?
Hi Todd
Yep there was a problem with the way I was creating the array in the relay_table_names.php file once there was more than 10 or more relays, I have changed this now to an associative array so that the order of the names in the database don’t matter. This had a bit of a flow on effect with the presentation on both the Index and Timers page so you will also need to update the following files from github
index.php
timers.php
relay_table_names.php
num_dt_pairs.php
initial_timer_data.php
Just a few small changes to each so that the presentation order is correct. Hopefully this should solve the problem but if not let me know.
Dom